「GIS教程」Windows 10 安装 Anaconda 小结
在之前的文章中介绍了《「GIS教程」macOS 安装 Anaconda 小结》,但国内绝大多数 GISer 的初学者应该使用的还是Windows,本文介绍在Windows 10安装 Anaconda 的方法。
下载安装包
官网下载地址:https://www.anaconda.com/distribution/
国内如果访问速度慢,可以从清华大学的镜像站下载。地址如下:
https://mirror.tuna.tsinghua.edu.cn/help/anaconda/
这里有一个问题要注意哦:如果你只安装了ArcGIS Desktop,没有安装 Background Geoprocessing(64-bit)的包的话,需要下载 Anaconda 32位版本;否则建议下载64位版本。
安装过程
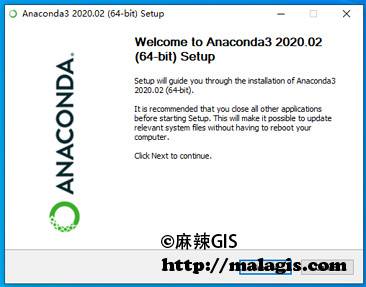
Windows 10 下安装也比较简单,直接双击,然后各种下一步。


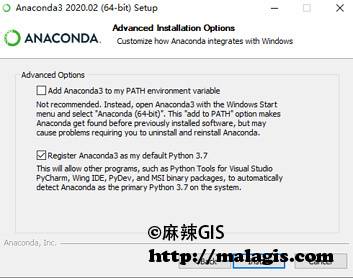
这里关于环境变量的配置,还是要注意一下,需要根据自己的需要来选择。如果要修改环境变量,可以使用我之前推荐的工具:推荐几个Windows环境变量管理工具
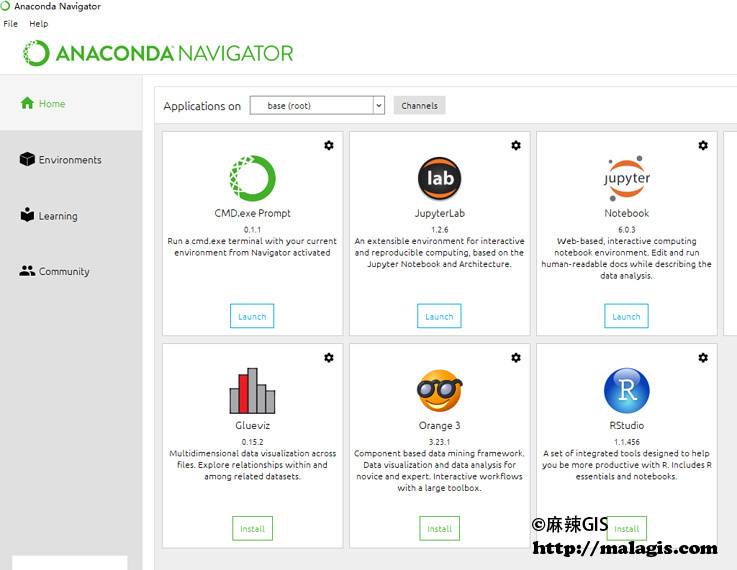
安装完成如下:

设置清华源
国内使用 Anaconda 安装一些包的时候速度会有点慢,可以使用清华大学的源。各系统都可以通过修改用户目录下的 .condarc 文件。Windows 用户无法直接创建名为 .condarc 的文件,可先执行
conda config --set show_channel_urls yes
生成该文件之后再修改。
channels:
  - defaults
show_channel_urls: true
channel_alias: https://mirrors.tuna.tsinghua.edu.cn/anaconda
default_channels:
  - https://mirrors.tuna.tsinghua.edu.cn/anaconda/pkgs/main
  - https://mirrors.tuna.tsinghua.edu.cn/anaconda/pkgs/free
  - https://mirrors.tuna.tsinghua.edu.cn/anaconda/pkgs/r
  - https://mirrors.tuna.tsinghua.edu.cn/anaconda/pkgs/pro
  - https://mirrors.tuna.tsinghua.edu.cn/anaconda/pkgs/msys2
custom_channels:
  conda-forge: https://mirrors.tuna.tsinghua.edu.cn/anaconda/cloud
  msys2: https://mirrors.tuna.tsinghua.edu.cn/anaconda/cloud
  bioconda: https://mirrors.tuna.tsinghua.edu.cn/anaconda/cloud
  menpo: https://mirrors.tuna.tsinghua.edu.cn/anaconda/cloud
  pytorch: https://mirrors.tuna.tsinghua.edu.cn/anaconda/cloud
  simpleitk: https://mirrors.tuna.tsinghua.edu.cn/anaconda/cloud
Anaconda + GIS
很多同学想知道为什么要折腾这个,目前使用 Python 进行数据分析是比较好的方向,并用 Python 会给传统 GIS 软件添加更多能力。这里给大家推荐一个 Esri 官方的公开课,介绍使用 Anaconda 进行空间数据,感兴趣的可以点这里->2019年Esri技术公开课(14)Python在GIS中的应用实例「GIS教程」Windows 10 安装 Anaconda 小结
相关阅读
声明
1.本文所分享的所有需要用户下载使用的内容(包括但不限于软件、数据、图片)来自于网络或者麻辣GIS粉丝自行分享,版权归该下载资源的合法拥有者所有,如有侵权请第一时间联系本站删除。
2.下载内容仅限个人学习使用,请切勿用作商用等其他用途,否则后果自负。


!["[GIS Book/EPUB] The GIS 20: Essential Skills(PDF版本)](https://image.malagis.com/gis00/book-cover/55a7d14785d13e8ae0ef646fcb3136b3-g.jpg?imageView2/1/w/100/h/70)


