
[WebGIS] HTML5跟踪GPS轨迹(5)记录轨迹功能实现
发布时间: 2016-11-14
所属分类: 使用HTML5开发GIS应用
前文《HTML5跟踪GPS轨迹(4)基本界面布局》构架了样式,本文实现记录轨迹的功能。
响应点击事件
vue中事件响应比较简单,代码如下:
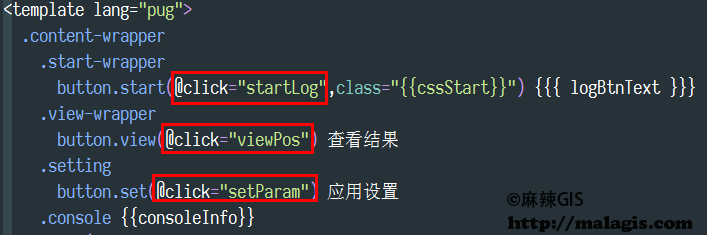
图中红框中的表示响应click事件,代码响应如下
/**
* 开始记录按钮响应
*/
startLog() {
  if (this.status === 0) {
    this.logBtnText = '记录中..<br><span class="subtitle">(点击停止)</span>';
    this.cssStart = 'red';
    this.status = 1;
    this.onStartLoc();
  } else {
    this.confirmObj.text = '是不是误触了?真的要停止记录?';
    this.confirmObj.btnOk = '停止记录';
    this.confirmObj.btnNo = '点错了';
    this.confirmObj.title = '温馨提示';
    this.confirmObj.okEvt = () => {
      this.logBtnText = '开始记录';
      this.cssStart = 'green';
      this.status = 0;
      this.confirmObj.show = false;
      this.onEndLoc();
    };
    this.confirmObj.show = true;
  }
},
这里表示在点击记录的时候,按钮变红,同时调用 onStartLoc 函数(代码如下)开始调用定位位置并记录位置。如果再次点击,就调用onEndLoc停止定位。
  /**
  * 打开数据库同时开始定位
  */
  onStartLoc() {
    const request = window.indexedDB.open('myLocation', '1');
    request.onsuccess = (openData) => {
      this.db = openData.target.result;
      this.onGeoNow();
      this.posObj.watchid = setInterval(this.onGeoNow, this.interVal * 1000);
    };
    request.onupgradeneeded = (upData) => {
      this.db = upData.target.result;
      if (!this.db.objectStoreNames.contains('locations')) {
        this.db.createObjectStore('locations', {
          autoIncrement: true,
        });
      }
    };
  },
onStartLoc函数中创建了IndexedDB的数据库和用于记录位置的表locations(参考《IndexedDB使用精简入门上篇》),同时调用onGeoNow函数开始获取地理位置(参考:关于HTML5中的定位函数)。注意: 这里使用的是setInterVal函数循环调用getCurrentPosition函数,为什么不使用watchPosition函数,因为我希望手动去设置数据的采样间隔。onGeoNow函数的定义如下:
/**
  * 封装定位函数
*/
onGeoNow() {
  navigator.geolocation.getCurrentPosition(
    this.onLocSuc, this.onLocErr, this.posObj.options
  );
},
/**
  * 定位成功回调
*/
onLocSuc(position) {
  const coord = {
    time: position.timestamp,
    latitude: position.coords.latitude,
    longitude: position.coords.longitude,
    accuracy: position.coords.accuracy,
    heading: position.coords.heading,
    speed: position.coords.speed,
  };
  const store = this.db.transaction(['locations'], 'readwrite').objectStore('locations');
  store.add(coord);
  this.consoleInfo += ` ${coord.time}`;
},
/**
  * 定位失败回调
*/
onLocErr(err) {
  console.log(err);
},
可以看到在定位成功获取到地理位置之后,将其数据信息写入了IndexedDB,也就是上面的store.add方法。最后是停止定位的响应函数:
/**
  * 结束定位函数
*/
onEndLoc() {
  clearInterval(this.posObj.watchid);
},
这里需要将setInterval的返回值的清除,调用clearInterval函数。
相关阅读


声明
1.本文所分享的所有需要用户下载使用的内容(包括但不限于软件、数据、图片)来自于网络或者麻辣GIS粉丝自行分享,版权归该下载资源的合法拥有者所有,如有侵权请第一时间联系本站删除。
2.下载内容仅限个人学习使用,请切勿用作商用等其他用途,否则后果自负。
手机阅读
公众号关注
知识星球
手机阅读

最新GIS干货

私享圈子


